Rubber Speed Event

Post a reply


This question is a means of preventing automated form submissions by spambots.
Smilies
:D :) ;) :( :o :shock: :? 8-) :lol: :x :P :oops: :cry: :evil: :twisted: :roll: :!: :?: :idea: :arrow: :| :mrgreen: :geek: :ugeek:

BBCode is ON
[img] is ON
[flash] is ON
[url] is ON
Smilies are ON

Topic review
   

Expand view Topic review: Rubber Speed Event

Re: Rubber Speed Event

Post by John Webster » Thu Feb 21, 2019 2:40 am

That looks like it could get hilarious.

Re: Rubber Speed Event

Post by kittyfritters » Mon Feb 18, 2019 12:30 am

The contest was, if nothing else, a lot of fun! The attendance was a bit disappointing, but I'm sure that it will be better the next time we try it after the club members get the report on it at the next meeting.

20190216_210636.jpg
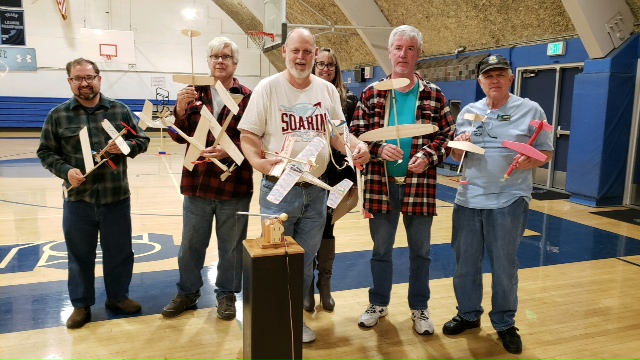
20190216_210636.jpg (133.24 KiB) Viewed 17119 times


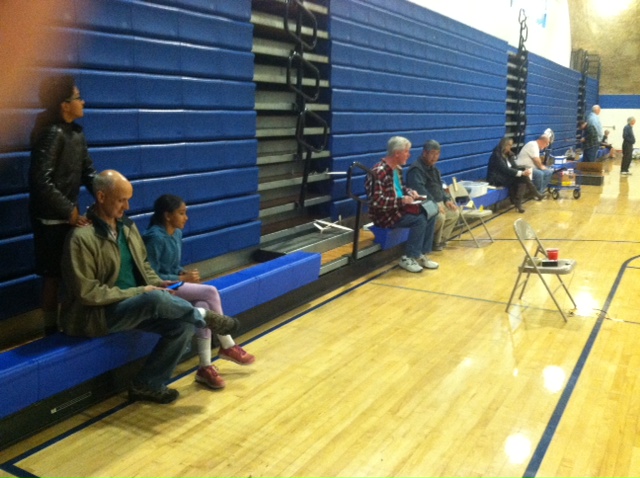
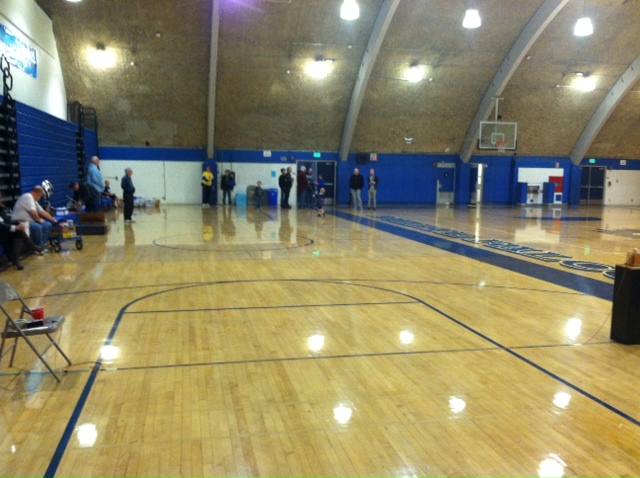
Since most of the Black Sheep members are in the San Fernando, Simi and Conejo valleys, it is a 45 minute to an hour (or more) drive to Duarte in Saturday night traffic. I realized that some of the more enthusiastic members, who are also in O.F.F.C. can no longer drive at night. They can't come to the Duarte sessions if they can't get a ride. We may have to work out a shuttle to get them there for contests. There were spectators since we share the site with the Santa Fe Dam RC fliers. We had the timing pylon set up in the northeast corner of the gym and the "low tech" pylon set up in the northwest corner for practice and trimming. This left space for some free flight and RC activity to take place in the rest of the space.

RTP1.JPG
RTP1.JPG (135.37 KiB) Viewed 17119 times


RTP2.JPG
RTP2.JPG (132.48 KiB) Viewed 17119 times


The flying was, if nothing else interesting. And, if the number of contestants was disappointing the number of models was not. No one showed up with less than two models. The faster models had two lap timings right around 3 seconds. Jim Leuken was to only one to get a sub 3 second time by the "brute force method". I don't know how many strands of 3/32", flat, tan he had on that flight but he used a Starlink Flight Tech motor strander, the same one he used for his Wakefield motors, to assemble it. And, that motor only worked for one flight. All of us were making motors all night. After a few flights we were using short, well lubricated, 4, 6, and 8 strand motors with about 600 to 750 turns. A motor would give about 3 competitive flights before going dead. I had a few feet of carefully stored Pirelli rubber left and I used it because it has a lot more torque than the F.A.I. tan at the start of the run. The problem with that was a bad launch was made even worse with all that torque. We also discovered that the rolled tube fuselage models were too small in diameter. They need to be at least 1-1/2 inches in diameter to hold more than a four strand motor. That doesn't mean they are not fast, a single loop of 1/4" Pirelli got my model into the 3 second (1-1/2 second laps) range with no trouble.

Those lap speeds caused another interesting problem. When you launch the model from the floor with the ten foot tether and the three foot pylon it's about 100 inches from the center of the circle. When it comes around again it's flying level with the pylon and it's 120 inches from the center of the circle. That means if you kneel down to launch the model and, stop to watch that it is flying stably when it crosses the timing line, 3/4 of a second later it's coming at your head at over 30 mph! (I don't care that the model only weighs 20 grams, it would still hurt!) I did that and ended on my ass avoiding getting hit, much to the amusement of everyone else. (Fortunately, no one got a video of that one.) The correct technique is to bend over to launch the model and take a step back.

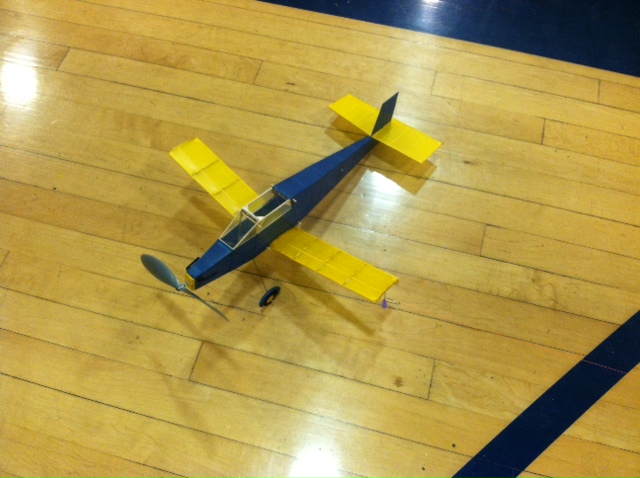
Another thing about the launching is something that Jim Leuken, with experience flying control line speed models, picked up on. The model should be level when launched. That's why his models had under rudders to give them a level stance on the ground. He were the only launches that were consistently without drama. Some of the others occasionally ended in a wingover if the line did not stay taught. There were some flights that ripped up the course interspersed with some spectacular crashes and an occasional failure to fly resulting in an extremely fast taxi. All during the contest we were helping each other giving advise gleaned from our last flight. There were also some real surprises. Bill Watson's push-pull full fuselage model was not performing well, but he had also brought a box of Embryos in case he got the chance to do some free flying. (He did impress the RC fliers with his indoor towline glider!) He had built one of my Wright Amount of Wrong Embryos and saw that it had a long, skinny fuselage so he assembled it with just the bottom wing, rebalanced it with a more powerful motor, put a pin in the wing tip to anchor the tether, and finished third in the full fuselage class!

RTP7.JPG
RTP7.JPG (118.79 KiB) Viewed 17119 times


The results were:

Unlimited
1. Jim Leuken
2. Bill Watson
3. Howard Littman

Covered Motor
1. Howard Littman
2. Dave Gee
3. Bill Watson

Re: Rubber Speed Event

Post by kittyfritters » Sun Feb 17, 2019 10:37 pm

After the flying my test hack (henceforth known as "The Hack") I decided that the wing needed two inches more span to handle the torque on takeoff. I simply enlarged the drawing spanwise. The original drawing had too many ribs so I decided to make the wing and the tail surfaces out of 3/32" stock and simply sand to a symmetrical airfoil. I flexed the structure and added gussets where needed. The covering was red Esaki tissue applied with glue stick. It was shrunk with rubbing alcohol but not fixed.

SpeedM11.JPG
SpeedM11.JPG (136.87 KiB) Viewed 17123 times


The tail section was simply glued to the tube. To attach the wing I glued two lengths of 1/8" square stock to the bottom of the wing a quarter inch to either side of the center line. I wrapped a piece of fine sandpaper around the tube, set the wing on it and moved it back and forth until the wing sat flush on the tube. The 1/8" square stock was now contoured as a wing saddle.

The tether wire was wrapped around a dowel the same diameter as the tube and then slipped over the tube. The landing gear wire was bent like it was made for an ROG model with a 1/8" stick, then the top section was bent back about 85 degrees and bound to the bottom of the tube with thread and CA. The rules said it had to have a canopy so I glued an old Enterprise bubble canopy on top of the tube.

Now I put rubber in the fuselage, wound the motor and let it unwind, and found the CG. I slid the tether wire to the CG and tacked it in place with CA, then positioned the wing and glued it in place.

Speedm13.JPG
Speedm13.JPG (93.78 KiB) Viewed 17123 times


Ready for the contest!

KF

Re: Rubber Speed Event

Post by kittyfritters » Sat Feb 16, 2019 3:58 am

Now, all I had to do was key the tail cone, run a prop shaft through it as a rear hook, and I had a fuselage.

SpeedM8.JPG
SpeedM8.JPG (81.71 KiB) Viewed 17144 times


SpeedM9.JPG
SpeedM9.JPG (82.5 KiB) Viewed 17144 times


SpeedM10.JPG
SpeedM10.JPG (79.02 KiB) Viewed 17144 times


Next wing, tail feathers, cockpit, landing gear and it's finished. The wing is two inches longer than the test hack so it should fly on six strands on 1/8" flat, tan Super Sport rubber.

KF

Re: Rubber Speed Event

Post by kittyfritters » Sat Feb 16, 2019 3:54 am

The tail cone I had to make. I cut a 1/64" plywood base disk using a compass then rough cut out six 1/8" thick disks also with the compass. Using the compass left a hole in the center of each disk so I could put a pin through it to line them up for gluing with CA. When the CA had set, about a minute later, I put the stack on a Dremel tool mandrel and chucked it into the tool.

SpeedM5.JPG
SpeedM5.JPG (73.72 KiB) Viewed 17144 times


I put on my mask, turned on the tool, grabbed my sanding block and 90 seconds later had a tail cone.

SpeedM4.JPG
SpeedM4.JPG (99.04 KiB) Viewed 17144 times


SpeedM7.JPG
SpeedM7.JPG (57.87 KiB) Viewed 17144 times

Re: Rubber Speed Event

Post by kittyfritters » Sat Feb 16, 2019 3:51 am

Finally, I got to work on my model, the Speed Merchant.

I decided to go with the rolled tube version since Bill Watson gifted me with a rolled tube he made for his model that apparently did not meet his specs. I found it to be a very nice tube. He made it the way I do by rolling the wet balsa and a layer of wet silkspan around a mandrel. He lets his dry overnight. The silkspan drys first and wicks the moisture out of the balsa. I'm not that patient so I bake them in the oven. Since my wife is not retired and I am a house husband I can get away with it.

SpeedM1.JPG
SpeedM1.JPG (83.47 KiB) Viewed 17144 times


Now to make the nose cone and tail cone. As it turned out I had the nose cone already made, I found it in my junk box. It was the nose cone from my "Unintended" P30 that was destroyed in the opossum invasion last year. It was for the same diameter rolled tube fuselage.

SpeedM2.JPG
SpeedM2.JPG (65.08 KiB) Viewed 17144 times


All I had to do was replace the prop with the aggressive Ikara prop that I have been testing and install a new prop shaft.

SpeedM3.JPG
SpeedM3.JPG (104.31 KiB) Viewed 17144 times

Re: Rubber Speed Event

Post by kittyfritters » Thu Feb 14, 2019 4:31 am

Did some more testing at the O.F.F.C. meeting this morning. Bill Watson came in with two designs of his own and the new, improved timing head.

HEAD1.JPG
HEAD1.JPG (101.42 KiB) Viewed 13306 times


The arm on the head is still sitting on a bearing from a CD drive but it now, lighter, tubular and has a counter weight. A slight breath on it will start it spinning for about thirty seconds and it has no appreciable drag on the line. At one point Bill had a tiny TV camera on it transmitting pictures to his cell phone. This worked but the playback looked like the model was standing still and the room was spinning which was a bit dizzying. Richard Cox (president of the Conejo Valley Silent Fliers) who built the readout box re-programmed it so that the miles-per-hour read out worked correctly. This did require making the line nine feet four inches long to take into account the length of the arm. The original line was 10 feet long, including the paper clips, and pivoted on the nail in the center of the pole.

Bill brought two models, one very conventional and the other, well, take a look.

Bills1.JPG
Bills1.JPG (90.56 KiB) Viewed 13306 times


Bills3.JPG
Bills3.JPG (64.27 KiB) Viewed 13306 times


The push-pull propellers run off opposite ends of the same rubber band. When asked why he made six bladed props he replied, "I was going to make five bladed props but when I made the blades I had a couple more left so, why not?" He did get the fastest time of the day but it was only a marginally faster than my test hack. I was testing different propellers and found a very aggressively pitched Ikara prop in my stash that I thought would work well but it was only a tenth of a second faster than with a Guillow's five inch, red prop. I'm really thinking that the red prop is seriously underrated! My test hack seems to fly best on two loops of 1/8" flat. Four loops provides way too much torque although a couple of inches more wing span (current span 8 inches) might counter that.

The contest is this Saturday at the Duarte High School gym, at 6:30 PM. If you can make it come out!

Re: Rubber Speed Event

Post by kittyfritters » Fri Feb 08, 2019 6:23 am

At yesterday's O.F.F.C. meeting we did more testing for the RTP speed event. I brought another test hack, an ROG type stick model with the wing and tail surfaces of my Speed Merchant design. Jim Leuken brought his improved design from last week and we had the three foot pole called for in the rules. Bill Watson brought the electronic timing pylon that he built for the contest.

My test hack had the wing held on by a rather strong rubber band so I could easily adjust the incidence. As I had thought the airfoil I am using needs a degree and a half of incidence to get the model off the ground within the first lap. Although with the three foot pole everything seems to get off the ground in the first lap.

Three foot pole.JPG
Three foot pole.JPG (90.5 KiB) Viewed 13415 times


I was using a five inch, Guillow's red prop and easily getting up in the twenty mile per hour range with four strands of 1/8" flat, tan, sport rubber. One thing I did find is that winding a thousand turns, or more, into a motor with four to six strands of rubber will rip the free wheel dog right off the front of the prop. Since we don't need a freewheel for this kind of flying just bend the shaft over the front of the prop. A may actually use the test hack as one of my entries in the contest with a more aggressive prop, maybe a four bladed prop. Another thing I found was that if you forget to aim one of these short winged monsters out of the circle at launch the line will go slack and the torque will wind the model into the line. With these motor stick types the line gets wound into the motor. We will need to have spare lines at the contest.

test hack2.JPG
test hack2.JPG (86.26 KiB) Viewed 13415 times


Jim tried to find the maximum sized motor for his design. He is used to handling strong motors since he flies in international Wakefield competition. However, he found that he can make too strong a motor for this type of model since with a very large number of strands you can get tremendous acceleration on the first lap but if the motor has too many strands you can't put enough winds in it to finish the third lap. Since the timing is on the second and third laps it defeats the purpose.

Bill's timing pylon was a heavy, impressive structure made of particle board with the timing platform and line pivot arm on top. It had two methods of timing, a micro switch tripped digital stop watch and a Hall effect sensor with a remote readout. The aluminum arm had a disk center with a spiral groove track on the bottom. There were two holes drilled into the track for the start of the second lap and end of the third lap. The track ended in a circle after the third lap hole. A whisker, attached to the micro switch rides in the track. The micro switch was tapped into the start/stop switch in the stop watch which was attached to the platform on the top of the pylon. You start the model with the whisker at the outside of the track. As the model flies around the pylon the arm rotates starting and stopping the watch when the whisker hits the holes. You have to go to the pylon to read the time, reset the watch and the whisker for the next flight. After a few test flights we realized that this Rube Goldberg electronic timer was just too touchy to work reliably.

The Hall Effect sensor, on the arm, was connected to a remote box with the electronics programmed to do the timing on the second and third lap and calculate the miles per hour at the push of a button. It also has a reset button and an on/off switch. This rig worked flawlessly except that the miles per hour calculation needs to be reprogrammed since it did not take into account the length of the arm. There was some concern about the drag of the massive (relatively) looking arm but it was not justified since the arm was on a bearing from a CD player and did not lag behind the line by the end of the first lap. In any event, since the mechanically tripped timer will be deleted there will be a much less massive arm on the pylon next week. The electronic timer pylon will definitely be used in the contest because with the regular pole and stop watches we discovered that with multiple people timing the spread between the times of a run were plus or minus 2 tenths of a second. We will still get another test session next Wednesday before the contest on the 16th.

https://youtu.be/3X_Qm-9_uV4

The 4.9 second time is 17.49 mph on rather tired rubber.

At the Black Sheep meeting, last night, Tony Naccarato brought some cut down Skystreaks that he converted into RTP racers. These are the new, improved Skystreaks (Still have the grain in the tail in the wrong direction.) with cut down wings. added landing gear, and the motor hook moved to the extreme rear of the fuselage. (Not to mention the paint job that he gave them.) These should easily get up into the twenty plus mile per hour range and don't take much time to build. At Duarte, last month, Dana Wall got a virtually unmodified Jetstream, with a four strand motor, up to 17 miles per hour where as a completely stock one would only get to 12.

Re: Rubber Speed Event

Post by kittyfritters » Wed Jan 30, 2019 10:37 pm

Jim Leuken brought his first interpretation of a rubber RTP speed model to the O.F.F.C. meeting this morning. It has some interesting features.

Jim_RTP_2.JPG
Jim_RTP_2.JPG (114.49 KiB) Viewed 13498 times


The rubber motor is on the outside side of the model instead of on the top or bottom to add a little tip weight. The wing has a higher aspect ratio than most of the designs I have seen, the landing gear attaches to the wing, not the fuselage and it has a Y tail with an under rudder.

Jim_rtp_1JPG.JPG
Jim_rtp_1JPG.JPG (122.65 KiB) Viewed 13498 times


Flight testing showed it still needs trim sorted out and the right combination of rubber (A lot of rubber!)and prop. More designs are showing up. Dave Gee showed a sketch of one he is working on that shows his usual penchant for bending the rules. Don't think that one will be built. More next week.

KF

Re: Rubber Speed Event

Post by kittyfritters » Thu Jan 24, 2019 9:27 pm

Here's a video of my test hack at OFFC Wednesday morning. Couldn't get it over 13.5mph at Duarte last Saturday, Changed to a smaller prop and cut the wings back down, in stages, to the original span and got a 24.43 mph flight out of it, probably the limit for that airframe, The vid was taken at the end of the session when the rubber was getting tired. It's only doing 16.34 mph in the video, Has too much incidence, jumps off the ground too soon and flies too high, but I think it give me the parameters for my real racer. Oddly enough, I think a scale D-12 Bonzo would do quite well.

https://www.youtube.com/watch?v=1MoqCCBgFmc

More Later!

KF

Top