 September 22, 2010 in
 By Marcel Lavoie (Marcels new email - please update your records if necessary)
Around the turn of the century I came up with a method of building box fuselages from stick balsa by lifting up the longerons when building a side frame, then placing a strip of balsa under them for marking and cutting the uprights, together with some tools to do the job.
The typical way people build is to place the upright strip over the longerons, and by sighting down or eyeballing, try to obtain the correct angles and length. That requires quite a bit of skill and time. My approach is far easier and faster. It works great for diagonal spacers and Warren truss type of structures with all the angled cuts, as well as for cross pieces.
The method described here deals with 3/32″ and 1/8″ square balsa strip, with some changes when using smaller and larger sizes of balsa(more on this later). A favorite model, the Miss Canada Sr., is used to illustrate the system. As a side note, the method has been found to be a great help to a fellow modeler handicapped by a stroke.
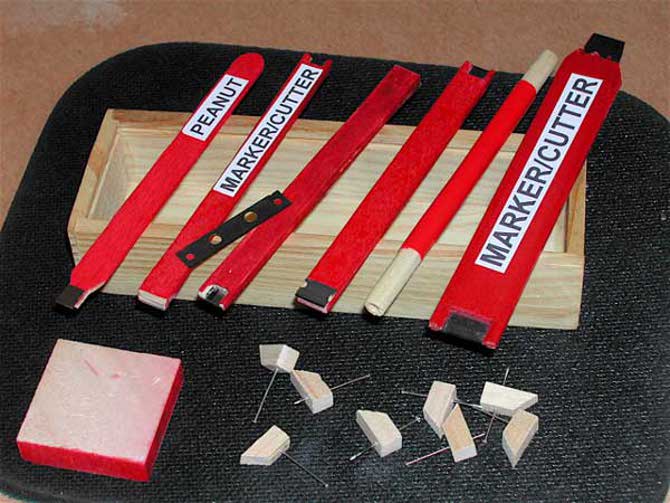
The tools for cutting spacers are very simple to make. There are two types of cutters, but at this point the discussion centers on what I call a MARKER/CUTTER because it is a double-ended tool in which one end is used to mark where the cut goes, and the other end of the tool, the cutter, finishes the job. The tool is made by sandwiching a short (3/8″) length of razor blade between two popsicle sticks having both ends squared off. Cut a 5/32″ deep x 1/4″ wide U-shaped opening in one end and square off the inside corners, then glue a piece of blade to the other end to serve as a marker. The blade should project from both ends no more than 1/32″. I use popsicle sticks because they are readily available and are a convenient size (1/16″ x 3/8″ x 4-1/2″).
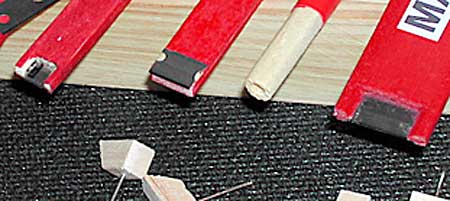
Use epoxy for gluing the sticks together and contact cement for the marker blade. This arrangement gives a very rigid support for the blade, even the narrowest ones I use which are 1/4″ wide. The long “handle” helps a lot in keeping the tool close to the vertical for nice square cuts. I use blades from our local Dollar Store and some double edged blades. I will leave it to the reader to work with what he has available. Better quality blades should give better results but the tool works beautifully to ensure accurate cuts on the first try, thus speeding the work along greatly. A second item that is required is a set of jig/building blocks as can be seen in the photos . These are made from a strip of hard 1/4″(16 lb.) square balsa cut into blocks 1/2″ long with one end sanded to 90 degrees and the other end cut to about 30 degrees. They could be made of pine or some similar wood.
Drill pilot holes about one third of the way from the square end to receive the pins which should be a tight fit in the hole. Make about 30-40 of these blocks which will be used mainly on the outside edges of the longerons. The pins remain in the blocks permanently. This size block can be used for both the 3/32″ and 1/8″ strips. A Pin Driver is next, make this from a 4-5 inch length of 1/4″ diameter hardwood dowel with a 1/8″ diameter hole drilled into each end. The depth of the holes is such that the straight pins do not penetrate my gypsum wallboard building board and ruin the kitchen table(ouch!). A last item that is needed is an end-grain chopping block, again hard balsa or pine, onto which the strip is placed for cutting after it has been marked. The two faces of the block have to be parallel of course and sanded smooth. Always use the end-grain block as this will give a cleaner cut as well as prolong the life of the blades.
Paint/colour all these tools (though not the faces of the block) with a bright colour so that they will be easy to spot among the clutter. This may seem like a long preamble but the tools just described will be available for future building jobs. It would be useful, nay, necessary, to provide for some type of container to hold the knives and blocks (mine were purchased at the same $ Store).

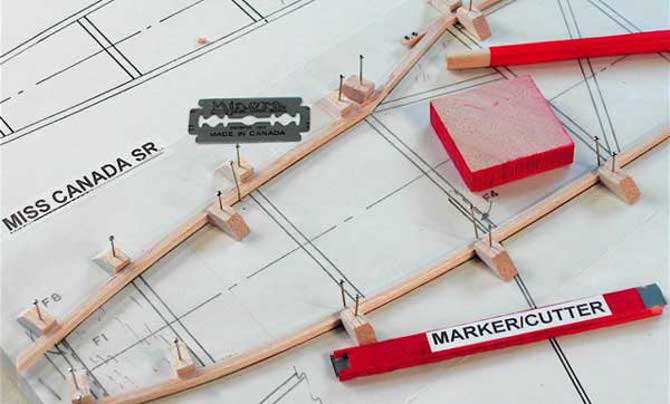
Compared to the standard way of placing the upright strip over the longerons, this new way is actually fun. Protect the plan in your usual way to prevent the structure from sticking to it. Lay down the longerons by placing the blocks for the top longeron in line with the upright positions. For the bottom longeron, place the blocks about 1/4″ off to the side of the upright positions so as to allow free passage of the upright strip under the longeron and to leave room for the marker. Glue up the several pieces of the top longeron if it is made up of more than one piece such as for a cabin model. For the inside edges of the longerons a pin at every second station might suffice.
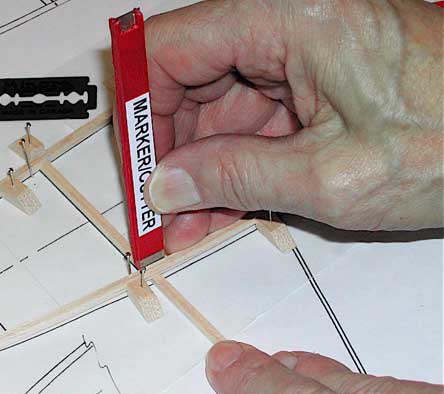
A word here on how to hold the tool… I find that holding it at a point about one third up from the bottom end gives a good control in keeping the tool vertical as well as making it easier to apply a slicing motion when needed for harder strips. OK, so we are ready to start. Insert a strip of balsa under the bottom longeron, then under the upper one. Line it up on the upright position and gently push blade side of the marker up against the top longeron to mark the angle at that end. At this point it would be a good idea to put a mark of some sort on the piece to ensure its proper orientation later – a “<” pointing towards the front is what I do.
Remove the strip and place it on the block for cutting with the other end of the tool. Re-insert the strip under the bottom longeron and slide it up against the top longeron which by this time has been lowered back down onto the plan. Push the strip up fairly tight against the top longeron and proceed to mark the lower end of that upright. Experience will tell you how much pressure is right. Remove, cut, and, voilà, one very neat fitting upright.
The angles and length are perfect! You really have to work hard to get a reject. The speed of this method and the high degree of accuracy is miles ahead of the old ways. After one side is built, remove it from the building board, but leave the blocks in place to build the second side. With the jig blocks in place it should not at all be difficult getting the two sides the same. A little care is necessary, but then again, we always do use a little care, don’t we?

The business of cutting diagonal cross pieces is handled in the same manner. Since we need the top view of the plan to cut the cross pieces, I draw a basic copy of that onto a strip of paper and staple it a few inches above the top view of the actual plan. The assembly of the side frames is done over this drawing using poster board triangles about 5″ high x 3″ at the base to keep the frames in line and square. An extension at the base is bent over to a 90 degree angle to allow stapling the triangles to the building board. For a typical model of, say, 36″ span, eight to ten of these triangles are needed. As each pair of cross pieces is cut mark them with an arrow as before. When gluing in place put the arrow marks towards the in- side of the fuselage.
For smaller models using 1/16″ square such as Peanuts, life is even simpler: The tool, if one can dare call it that, is simply a short length of razor blade glued onto the side of a popsicle stick. Narrow the end of this tool to 1/4″ wide to accommodate tighter inside curves on small models. Leave no more than 5/64″ projecting from the end and glue it on using contact cement. A neat way to measure this is to push the cutting edge of the blade through a scrap of the chosen longeron material with about 1/64″ projecting. This simple device will be used to cut the uprights and cross-pieces while the strip is still under the longerons. For 3/16″ and 1/4″ wood on larger model the type of marker/cutter described at the outset is made bigger, eg, two strips of 1/16″ ply or pine, 3/4″ x 5″ long, with a 1/2″ wide opening, just over 1/4″ deep. Jig blocks 1/2″ square could do for these two sizes of strip.
So, there it is. It is not an automatic thing, but after you get the feel of using these tools – and this will come quickly – you will be surprised at the beauty of it. Anyone having questions or suggestions can reach me at harrier@nb.sympatico.ca, or at, Marcel Lavoie, 111Victoria Street, Campbellton, N.B. Canada, E3N 1J6
-by Marcel Lavoie (Marcels new email - please update your records if necessary)
October 20, 2010 at 10:24 am
I plan to make a Marker-Cutter tool. (Already have a box of popsicle sicks. – all we need is razor blades.)
I’m sure that tool help me a lot – even if I don’t follow your other suggestions to the letter.
Thankjs fir sharing this .
Tom